

Better Homes And Gardens Crossmill Lateral File Locked Door
Introduction
Synopsis
A mysterious and powerful criminal has been spotted in Skyrim, his trail dogged by hunters from Morrowind. However, there may be more at stake than it seems, and this criminal may be familiar...
Disclaimer
Moon and Star is a quest mod that adds new content in the form of a main quest, a town, a dungeon, and five miscellaneous quests. The mod is designed so that the main quest can be completed just by stumbling upon certain locations. As such there is no one right way to proceed through the quests. It is recommended to use this walkthrough as a guide to help if you get stuck. Play the mod and enjoy it. This walkthrough will spoil everything. Read at your own peril.
Lastly
This guide is not written by the mod author. Everything in this guide was deduced through multiple playthroughs and the CK. If I've made a mistake please let me know. Thank you.
Mod Download Locations
Nexus Link: Moon and Star for Skyrim[www.nexusmods.com]
Nexus Link: Moon and Star for Skyrim Special Edition[www.nexusmods.com]
Steam Link: http://steamcommunity.com/sharedfiles/filedetails/?id=241926717
Walkthrough Quest Flowchart
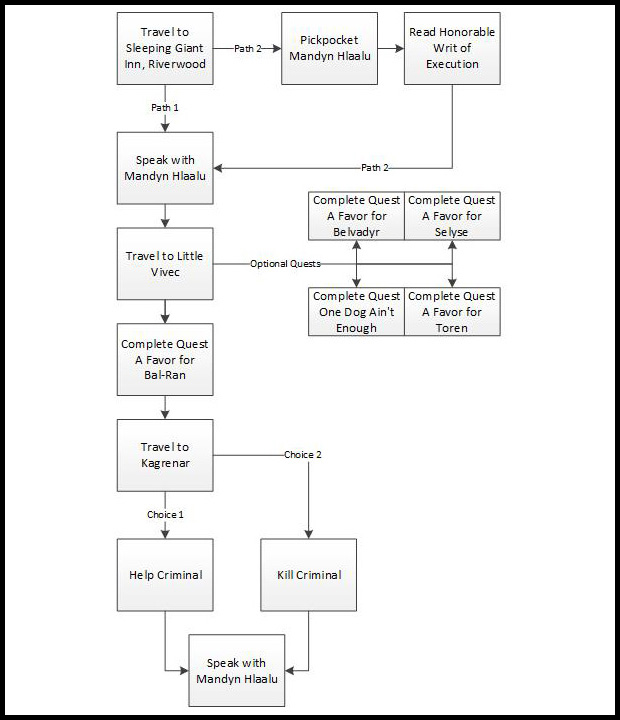
Main Quest: Moon and Star, pt1
Quest Giver: Courier or Mandyn Hlaalu
Location(s): Sleeping Giant Inn in Riverwood, Little Vivec, Moss Creek Camp, Kagrenar
Reward: 500-2000 gold, Black Hands Dagger, Azura's Curse, and Ring of Sanguine Resistance or Access to One-Handed Master Trainer, and choice of Bow of Shadows, The Paladin's Blade or Mace of Aevar Stone-Singer
Quest ID: MASMainQuest
Quick Walkthrough
1. Travel to Sleeping Giant Inn, Riverwood
2. Path 1: Talk to Mandyn Hlaalu or Path 2: Pickpocket Mandyn Hlaalu
3. Travel to Little Vivec.
4. Kagrenar.
5. Talk to Mandyn Hlaalu.
6. Your choices matter.
Detailed Walkthrough
Quest Notes
The quest can be started by fast traveling and receiving a courier from Mandyn Hlaalu or simply talking to Mandyn Hlaalu at the Sleeping Giant Inn in Riverwood. How you interact with Mandyn alters the various dialogue options as well as the potential rewards.
Path 1: Talk to Mandyn Hlaalu
A courier will deliver a letter. The letter is addressed to the Dragonborn as states the following:
"I hope this letter finds you well, for Skyrim, Morrowind and the great House Hlaalu all are in need of your strength. A grave threat from my homeland of Morrowind has migrated to Skyrim, and though I nip at its heels, I fear that I cannot bring it down alone. Please, if you care at all for this land and her peoples, meet me at the Sleeping Giant Inn in Riverwood as soon as you can.
- Mandyn Hlaalu"
Travel to the Sleeping Giant Inn and speak with Mandyn. He will ask for your help tracking down a dangerous criminal from Morrowind. Agree to help him and he will mark the location of Little Vivec on your map and will later reward you for ridding Skyrim of the criminal. Your reward is based on how you negotiate during the conversation.
Reward Negotiations- 500 gold – Except the task with no negotiating.
- 1000 gold – Respond with "This hero comes with a fee."
- 2000 gold – Respond with "I'm a really, really good hero."
Tell Mandyn you need to be going and he will give you the Ring of Sanguine Resistance (40% Fire Resistance).
Path 2: Pickpocket Mandyn Hlaalu
A courier will deliver a letter. The letter is addressed to the Dragonborn as states the following:
"I hope this letter finds you well, for Skyrim, Morrowind and the great House Hlaalu all are in need of your strength. A grave threat from my homeland of Morrowind has migrated to Skyrim, and though I nip at its heels, I fear that I cannot bring it down alone. Please, if you care at all for this land and her peoples, meet me at the Sleeping Giant Inn in Riverwood as soon as you can.
- Mandyn Hlaalu"
Travel to the Sleeping Giant Inn and pickpocket the Honorable Writ of Execution letter off Mandyn. Reading the letter reveals that Mandyn is a member of the Morag Tong Guild and he has been sanctioned to kill the Nerevarine. Speak with Mandyn and make reference to the fact that you know who he is and who he's hunting. He will still ask for help but since you now know the target, he will sweeten the deal by also offering a relic of the Morag Tong, the Black Hands Dagger. Haggle to receive more gold for killing the Nerevarine. Agree to help him and he will mark the location of Little Vivec on your map. Tell Mandyn you need to be going and he will give you the Ring of Sanguine Resistance (40% Fire Resistance) to help in your fight.
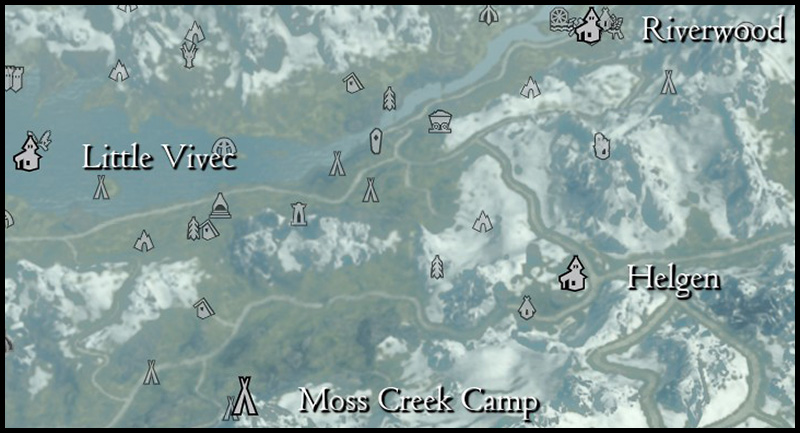
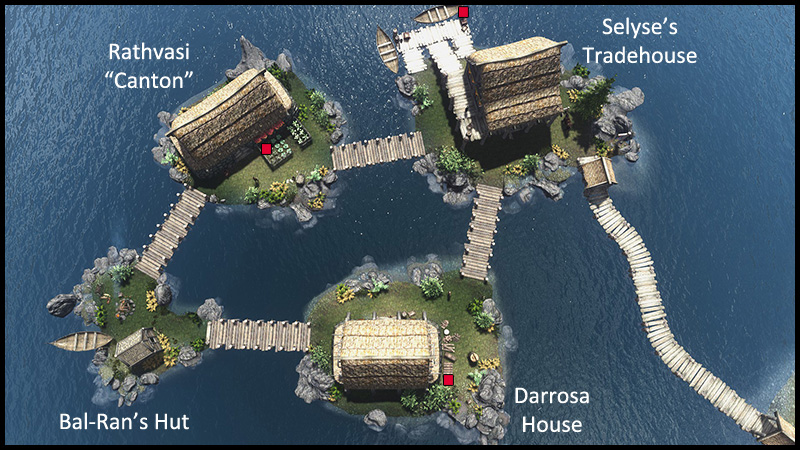
Travel to Little Vivec
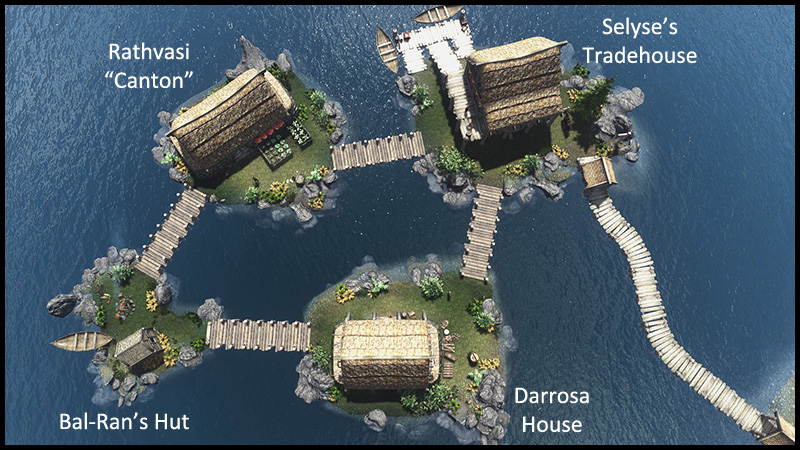
Little Vivec is located south of Riverwood and is situated on four small islands in Lake Ilinalta. Talk to all of the villagers and seek information concerning a recent visitor to the village. It's best to complete all five miscellaneous quests at this time. To learn the location of the criminal complete the miscellaneous quest, A Favor for Bal-Ran, or read Bal-Ran's Journal found in the chest inside his hut.
Main Quest: Moon and Star, pt2
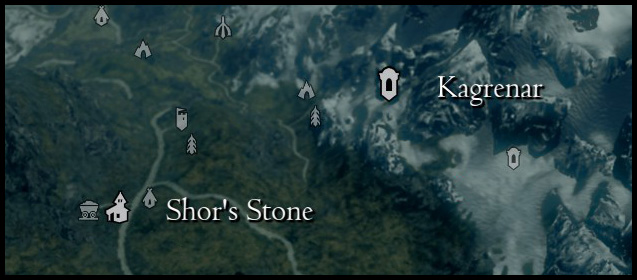
Kagrenar
Kagrenar is a Dwemer ruin located east of Shor's Stone. Enter the ruin. There are three main rooms. In each room there is a chest with a book resting beside it on a pedestal. Each book contains a riddle, and the answer to each riddle is an item within the corresponding room. The player must find the correct item and place it in the chest to unlock the door blocking the path ahead. If they answer incorrectly, they will be attacked by an ambush of Dwemer spiders, spheres and centurions. After each ambush, the door will unlock.
First Room
Read the book The First Question found on the pedestal.
"Powerful magic given form
Two souls it binds with an ancient force"
Look around the room for a Dwemer marriage pendant and place the pendant in the chest in the center of the room. Placing anything else in the check will cause an ambush of Dwemer spiders. The doors will unlock. Go to the second room.
Second Room
Read the book The Second Question found on the pedestal.
"The mightiest weapon in all creation
With it, mortals become gods
For only it can slay time"
Look around the room for a quill and place the quill in the chest in the center of the room. Placing anything else in the check will cause an ambush of Dwemer spheres. The doors will unlock. Go to the third room.
Third Room
Read the book The Third Question found on the pedestal.
"When cold it destroys
When hot it creates
Let it encase your heart for what lies ahead"
Look around the room for a steel ingot and place the ingot in the chest in the center of the room. Placing anything else in the chest will cause an ambush of a Dwemer centurion. The doors will unlock and you can now proceed. Just outside the third room is a door to your left. If you answered all three questions correctly this door will be unlocked. Enter the room and pick up the Kagrenar Tomb Key. If you answered any of the questions incorrectly this door will remain locked and cannot be opened. Proceed to the end of the hall and enter Kagrenar Depths.
Kagrenar Depths
In the first room is a similar setup to the previous areas. In this room is the book, The Final Trial.
The Final Trial"Take the keys that rest within
You'll need them for the path ahead
But for those unworthy, they unlock only death"
There is nothing to place in the final chest however. Make your way down the hall and you will meet the criminal. The criminal will reveal himself to be the Nerevarine. At this point you either choose to help him or choose to kill him. There are consequences for either choice.
Help the Nerevarine
If you choose to help the Nerevarine he will unlock the doors and you will help fight the ancient centurion. The Ancient Centurion Titan cannot be harmed while all three power cores exist. There are four levers in the room. The lever to the left as you enter the final room resets the shields and does not need to be pulled. The three other levers control the power beams protecting the power cores. You can pull one lever at a time. Pulling a lever will turn the purple beams that protect the power cores to a red beam and allow you to destroy the power cores.
While the Nerevarine is engaging the Titan, pull the first lever on the pillar and destroy the unprotected power core. After destroying the power core and go to the next lever. Pull the lever and then destroy the next unprotected power core. After destroying the second power core and go to the next lever. Pull the lever and then destroy the last unprotected power core. With the last power core destroyed finish off the Ancient Centurion. Loot the Kagrenar Lift Key off the Titan.
Speak to the Nerevarine and he will offer you a choice of three rewards.
- Bow of Shadows (Fortify Sneak 20pts)
- The Paladin's Blade (Resist Fire 20pts, Resist Magic 20pts, Absorb Health 20pts)
- Mace of Aevar Stone-Singer (Frost Damage 30pts)
After making your choice the Nerevarine will thank you and travel to the Shrine of Azura where he will remain.
Go to the locked door at the back of the Titan room. This door is unlocked with the Kagrenar Tomb Key found earlier. Inside the tomb will be Dorana's Hammer, a Dwemer Warhammer with fire damage, two leveled loot chests, and the book, Ancient Dwemer Tome written in Dwemer.
Exit Kagrenar Depths via the lift gate. Once outside on Kagrenar, pull the lever inside the gate house to unlock the door. As you leave the gate house Mandyn Hlaalu will approach you as ask for the Ring of Sanguine Resistance back. If you give him the ring, he will attack you. If you refuse he will attack you as well so it's best to refuse since you will be unable to loot the ring off his dead body. After killing Mandyn, the quest is complete.
Kill the Nerevarine
If you choose to kill the Nerevarine prepare for a long fight. After killing the Nerevarine, loot his body for the key to unlock the doors as well as the Nerevarine's weapons and ring. The Nerevarine carries one-handed swords Hopesfire (Shock Damage 30pts) and Trueflame (Fire Damage 30pts) plus the Moon-and-Star ring which will kill you instantly if you equip it. Note that the Neravarine's armor is not lootable.
Unlock the door and proceed to the Titan's room. The Titan will not be hostile and will remain locked up. Go to the locked door at the back of the Titan room. This door is unlocked with the Kagrenar Tomb Key found earlier. Inside the tomb will be Dorana's Hammer, a Dwemer Warhammer with fire damage, two leveled loot chests, and the book, Ancient Dwemer Tome written in Dwemer.
Exit Kagrenar Depths via the lift gate. Once outside on Kagrenar, pull the lever inside the gate house to unlock the door. As you leave the gate house Mandyn Hlaalu will approach you as ask for the Ring of Sanguine Resistance back. Give him the ring and he will reward you for your help and also declare you a member of the Morag Tong. The quest is now complete.
Main Quest: Moon and Star, pt3
The Aftermath
The choices made during the quest have consequences. If you killed the Nerevarine, 24 in game hours later, the next time you go to sleep, he will appear in a dream and place a powerful curse on you. Check Active Effects and you'll see the Curse of Azure. The curse reduces your health by 50 and your speech by 25. The curse is permanent and cannot be undone. You will also be visited by a courier with a letter and a gift from the Morag Tong. The courier will give you the letter and the Black Hands Dagger. Your actions also change how the villagers of Little Vivec interact with you. Selyse at the Tradehouse will no longer sell or buy items from you and Bal-Ran will no longer train or speak with you.
If you decided to help the Neravarine, you will be attacked by assassins the next time you enter any of the vanilla player homes in the game. In little Vivec, you will receive the Special Discount perk from Selyse that grants 20% better prices at the Tradehouse. At the Shrine of Azura, the Neravarine will be there. Take the Ancient Dwemer Tome you found in the tomb to him and he will translate it for you. The Neravarine is also a master one-handed trainer and will train you at the Shrine of Azura if asked.
Quest Stages
Stage 10 Speak to Mandyn Hlaalu
Stage 20 Pick up the criminal's trail in Little Vivec
Stage 30 Search the ruins of Kagrenar
Stage 40 Defeat the Nerevarine
Stage 50 Defeat the Dwemer weapon
Stage 60 Speak to the Nerevarine
Stage 70 Speak to Mandyn Hlaalu
Stage 90 Quest Complete
Stage 92 Quest Complete
Misc Quest: A Favor for Bal-Ran
Quest Giver: Bal-Ran
Location(s): Bal-Ran's Hut, Little Vivec, Moss Creek Camp
Reward: Criminal's location
Quest ID: MASBalRanDialog
Quick Walkthrough
1. Talk to Bal-Ran.
2. Travel to Moss Creek Camp.
3. Kill the bandits of Moss Creek Camp.
4. Return to Bal-Ran with the bandit leader's helm as proof.
Detailed Walkthrough
Talk to Bal-Ran
Bal-Ran is an expert marksman trainer that hunts and fishes for the village of Little Vivec. He is the only citizen of Little Vivec that has relevant information related to the main quest. Ask Bal-Ran if he needs help and he will mention a group of bandits that have been harassing the village. Bring back the bandit leader's helm as proof that the bandit threat has been removed. Moss Creek Camp will be added to your map if you haven't already discovered the location.
Travel to Moss Creek Camp
Travel to Moss Creek Camp located southeast of Little Vivec.
Kill the bandits of Moss Creek Camp
Upon at arriving at the bandit camp you will find everyone is dead. The dead bandit leader can be found near the base of the waterfall. Retrieve the bandit leader's helmet and return to Bal-Ran.

Return to Bal-Ran
Return to Bal-Ran and he will give you the location of the criminal from the main quest.
Quest Stages
Stage 10 Claim the leader of Moss Creek Camp's helm
Stage 20 Return to Bal-Ran
Stage 30 Complete Quest
Misc Quest: A Favor for Belvadyr
Quest Giver: Belvadyr Rathvasi
Location(s): Rathvasi "Canton", Little Vivec
Reward: 50 gold
Quest ID: MASBelvadyrFavor
Quick Walkthrough
1. Talk to Belvadyr.
2. Deliver proclamations.
3. Return to Belvadyr.
Detailed Walkthrough
Talk to Belvadyr
Belvadyr Rathvasi is the leader and founder of Little Vivec and head of Rathvasi Canton. He can be found outside his house Rathvasi Canton with his wife Velyna. Belvadyr is full of information about Little Vivec and gladly shares the town's history. If you ask him if he needs help he will ask you to deliver proclamations to three of Little Vivec's citizens. Accepting the job will place three notes in your inventory: Bal-Ran's Proclamation, Selyse's Proclamation, and Toren's Proclamation.
Deliver proclamations
Deliver Belvadyr's proclamations to Bal-Ran found outside of Bal-Ran's hut, Toren Darrosa found chopping wood outside the Darrosa House, and Selyse Andrathil found tending shop inside Selyse's Tradehouse.
Return to Belvadyr
Return to Belvadyr and receive 50 gold as payment.
Quest Stages
Stage 10 Deliver Bal-Ran's proclamation
Stage 20 Deliver Selyse Andrathil's proclamation
Stage 30 Deliver Toren Darrosa's proclamation
Stage 40 Return to Belvadyr Rathvasi
Misc Quest: A Favor for Selyse
Quest Giver: Selyse Andrathil
Location(s): Selyse's Tradehouse, Little Vivec
Reward: 300 gold, Necklace of Brawn (Fortify Carry 45pts)
Quest ID: MASSelyseDialog
Quick Walkthrough
1. Talk to Selyse.
2. Gather supplies.
3. Return to Selyse.
Detailed Walkthrough
Talk to Selyse
Selyse Andrathil runs the Tradehouse in Little Vivec and needs help restocking supplies. She needs the following supplies:
- 5 Wolf Pelt
- 5 Nirnroot
- 10 Tundra Cotton
- 10 Lavender
- 5 Venison
Gather supplies
All supplies are easily found growing or roaming around Riverwood and Whiterun.
Return to Selyse
After gathering the needed supplies return to Selyse. She will pay you 300 gold for the supplies and also give you the Necklace of Brawn that increases your carrying capacity by 45.
Quest Stages
10 Gather 5 Wolf Pelts for Selyse Andrathil
12 Gather 5 Nirnroot for Selyse Andrathil
14 Gather 10 Tundra Cotton for Selyse Andrathil
16 Gather 10 Lavender for Selyse Andrathil
18 Gather 5 Venison for Selyse Andrathil
20 Bring Selyse Andrathil her supplies
30 Complete Quest
Misc Quest: A Favor for Toren
Quest Giver: Toren Darrosa
Location(s): The Darrosa House, Little Vivec, Riverwood
Reward: 50-150 gold
Quest ID: MASTorenDialog
Quick Walkthrough
1. Talk to Toren.
2. Deliver Toren's order to the Riverwood Mill.
3. Return to Toren.
Detailed Walkthrough
Talk to Toren
Toren Darrosa is the twin brother of Taren Darrosa. Toren can be found chopping wood outside the Darrosa House while his better looking twin brother sits in a chair gazing across Lake Ilinalta. Speak with Toren and ask if he needs any help. He will offer a job delivering an order letter to the Order Chest behind the Riverwood Mill. Accepting the quest will place Order: Little Vivec note in your inventory. The reward for completing the delivery depends on how you negotiate.
- 50 gold – Except the task with no negotiating.
- 100 gold – Respond with "For the right price."
- 150 gold – Respond with "Sounds like you're cheap."
Deliver Toren's Order
Travel to Riverwood and place the Order: Little Vivec in the Order Chest behind the Riverwood Mill.
Return to Toren
Return to Toren to receive 50, 100, or 150 gold as payment.
Quest Stages
Stage 10 Deliver Toren's order to the Riverwood Mill
Stage 20 Return to Toren
Stage 30 Complete Quest
Misc Quest: One Dog Ain't Enough
Quest Giver: Albert
Location(s): Little Vivec
Reward: Lucky Coin, Luck of the Emperor ability
Quest ID: MASAlbertDialog
Quick Walkthrough
1. Talk to Albert.
2. Find Albert's three stuffed dogs.
3. Return to Albert.
Detailed Walkthrough
Talk to Albert
Albert is a Nord child whose parents left him to join the Stormcloaks. Albert was found by Selyse Andrathil whom took him in and raises him as an adoptive son. Albert can be found playing near Selyse's Tradehouse with his dog Meat.
Speak with Albert and he will ask if you want to help him and Meat stop the apocadypse from happening by finding his three stuffed dogs hidden around Little Vivec.
Find Albert's three stuffed dogs
Albert's three stuffed dogs can be found in the following locations
- On a dock post behind the Tradehouse.
- By the planted leeks in Velyna Rathvasi's garden
- Next to the pile of logs by the Darrosa house
Return to Albert
Return to Albert and give him the three stuffed dogs. Albert will thank you for stopping the apocadypse and give you a Lucky Coin which will also grant you the Luck of the Emperor ability.
Notes:
Lucky Coin is just a miscellaneous object in your inventory.
Luck of the Emperor ability increases the chance that you'll find rare items for 30 minutes and can be cast once per day.
Quest Stages
Stage 10 Find Albert's three stuffed dogs
Stage 20 Find two more stuffed dogs for Albert
Stage 30 Find Albert's last stuffed dog
Stage 40 Return to Albert
Appendix: Armor
Location: Moss Creek Camp
Type: Orc Helmet
Value: 500
Weight: 8
Armor Rating: 20
Enchantment: None
Location: On Neravarine
Type: Ring
Value: 350
Weight: 0.25
Armor Rating: 0
Enchantment: Kills the wearer instantly.
Location: Reward for Completing Miscellaneous Quest, A Favor for Selyse
Type: Amulet
Value: 150
Weight: 0.5
Armor Rating: 0
Enchantment: Fortify Carry 45pts
Location: Given by Mandyn in Riverwood
Type: Ring
Value: 150
Weight: 0
Armor Rating: 0
Enchantment: Resist Fire 40pts
Appendix: Weapons
Location: Carried by Bal-Ran
Type: Steel Bow
Value: 50
Weight: 7
Speed: 0.9375
Damage: 12
Enchantment: None
Location: Reward for killing the Neravarine
Type: Daedric Dagger
Value: 650
Weight: 6
Speed: 1.3
Damage: 11
Enchantment: Absorb Health 25pts
Location: Reward for helping the Neravarine
Type: Bound Bow
Value: 1100
Weight: 7
Speed: 0.9375
Damage: 17
Enchantment: Fortify Sneak 20pts
Location: Reward for helping the Neravarine
Type: Greatsword
Value: 1200
Weight: 18
Speed: 0.7
Damage: 28
Enchantment: Resist Fire 20pts, Resist Magic 20pts, Absorb Health 20pts
Location: Kagrenar Depths tomb
Type: Dwarven Hammer
Value: 350
Weight: 27
Speed: 0.6
Damage: 22
Enchantment: Fire Damage 10pts
Location: On Neravarine
Type: One-handed Sword
Value: 1200
Weight: 16
Speed: 1.0
Damage: 16
Enchantment: Shock Damage 30pts
Location: Reward for helping the Neravarine
Type: Mace
Value: 1000
Weight: 19
Speed: 0.8
Damage: 18
Enchantment: Frost Damage 30pts
Location: On Neravarine
Type: One-handed Sword
Value: 1200
Weight: 16
Speed: 1.0
Damage: 16
Enchantment: Fire Damage 30pts
Appendix: Magic and Books
Magic
Curse of Azura Received: Consequence for killing the Neravarine
Type: Active Effects
Effect: Health -50pts, Speechcraft -25pts
Received: Reward for completing miscellaneous quest, One Dog Ain't Enough
Type: Ability
Effect: Increase chance to find rare items, 30 minutes, once per day
Books and Notes
- To the Dragonborn – Given by Courier
- Bal-Ran's Journal – Chest in Bal-Ran's Hut
- Bal-Ran's Proclamation – Given by Belvadyr Rathvasi
- Selyse's Proclamation – Given by Belvadyr Rathvasi
- Toren's Proclamation – Given by Belvadyr Rathvasi
- Honorable Writ of Execution – On dead Mandyn Hlaalu
- Honorable Writ of Execution – On living Mandyn Hlaalu
- Order: Little Vivec – Given by Toren Darrosa
- The First Question – Kagrenar
- The Second Question – Kagrenar
- The Third Question – Kagrenar
- The Final Trial – Kagrenar Depths
- Ancient Dwemer Tome – Kagrenar Depths
- Memories of Dorana – Shrine of Azura
- To the Slayer of Legends – Given by Courier after killing the Neravarine
Better Homes And Gardens Crossmill Lateral File Locked Door
Source: https://steamcommunity.com/sharedfiles/filedetails/?id=347340094
Posted by: arneybadeltudy.blogspot.com
0 Response to "Better Homes And Gardens Crossmill Lateral File Locked Door"
Post a Comment