

How To Can Potatoes From The Garden
Pressure canning potatoes is a great way to preserve an abundant harvest for long-term food storage. The shelf-stable jars of potatoes are handy for quick additions to meals.
Potatoes can last a long time when stored in a cool, dark location. Sometimes the storage conditions are not ideal. Preserving potatoes by pressure canning makes them shelf stable so they last longer.
Potatoes that are damaged or small won't last long in root cellar storage either. So if your potato crop yielded a great deal of small tubers, or you managed to damage a lot while digging them up, pressure canning potatoes is a good way to preserve them.
The first time I tried canning potatoes was to save my storage potatoes when they began to get soft and sprout. I still had about 50 pounds of potatoes in our root cellar basement and there was no way we could use them up quickly enough before they spoiled.
So, I pulled out my pressure canner, canning equipment, trusted Ball Blue Book Guide to Preserving, and went to work peeling and cutting the potatoes.
Ways to Use Canned Potatoes
I wasn't sure if we would even like canned potatoes, but discovered that not only were they similar in texture to regular potatoes, but they were so convenient to cook with.
Canned potatoes are handy to have for speedy additions to meals. Since the potatoes are already precooked, peeled, and cut, they are quicker to prepare.
Pressure canned potatoes can be used the same way as cooked potatoes, such as fried, mashed, or roasted. For mashed potatoes, simply reheat them briefly in boiling water, drain, and mash as you would for regular mashed potatoes.
You can also use canned potatoes in chowders, soups, and stews. Since they are already pre-cooked, add the canned potatoes at the end of your cooking time, so they don't get too soft.
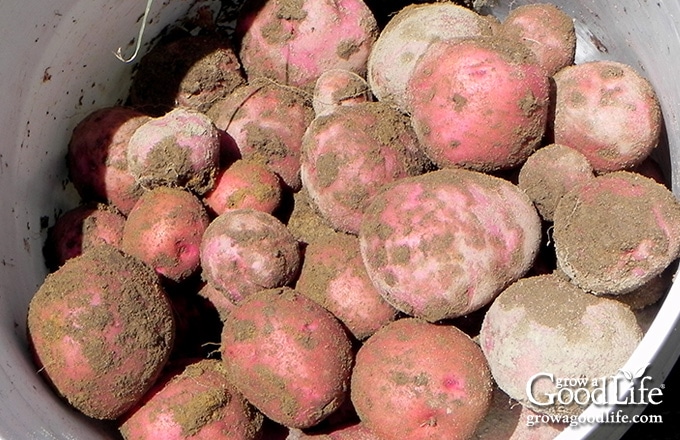
Now I grow two smaller crops of potatoes in our garden each year instead of one large crop. One is my main crop of storage potatoes that is planted in spring, harvested in fall, and stored in our root cellar basement for winter.
- 5 Steps to Storing Potatoes for Winter
The second is a fall planting of red potatoes that are harvested small right before the ground freezes, and canned for food storage. The storage potatoes are used through winter, and the canned potatoes fill the gap until the next harvest.
Tips for Pressure Canning Potatoes
When canning white potatoes remember to:
Use a Pressure Canner
Potatoes are low acid foods and need to be canned with a pressure canner. When I began canning foods, I did some research and purchased, Presto 16-Quart Aluminum Pressure Canner. It holds a canner load of 9-pint or 7-quart size jars. Plus it is light enough for me to lift a full canner off the stove without help.
Choose the Best Potatoes for Canning
Some potatoes are better for canning than others. Avoid potatoes that are typically used for baking, such as russets. The starchy and mealy texture will not result in a good-quality canned product. Preserve these types as frozen French fried potatoes instead.
- How to Freeze Potato French Fries
Choose "waxy" or "boiling" types of potatoes for canning. Most red potatoes are suitable, and many thin-skinned round white and gold potatoes work well when canned. Small potatoes, or young potatoes referred to as "new potatoes," are also great candidates for pressure canning. These tend to be less starchy than mature potatoes.
You want a potato that keeps its shape and texture during the canning. Potatoes need to be firm enough that they do not become mushy when pressure canned. Choose potatoes that hold up well after heating, and not one that falls apart when cooked.
Peel the Potatoes
You will need to peel your potatoes before canning. There are no safe tested recipes for canning potatoes with the skins on. Removing the skins by peeling potatoes reduces the amount of bacteria on the potato.
Can Whole or Chunked Potatoes
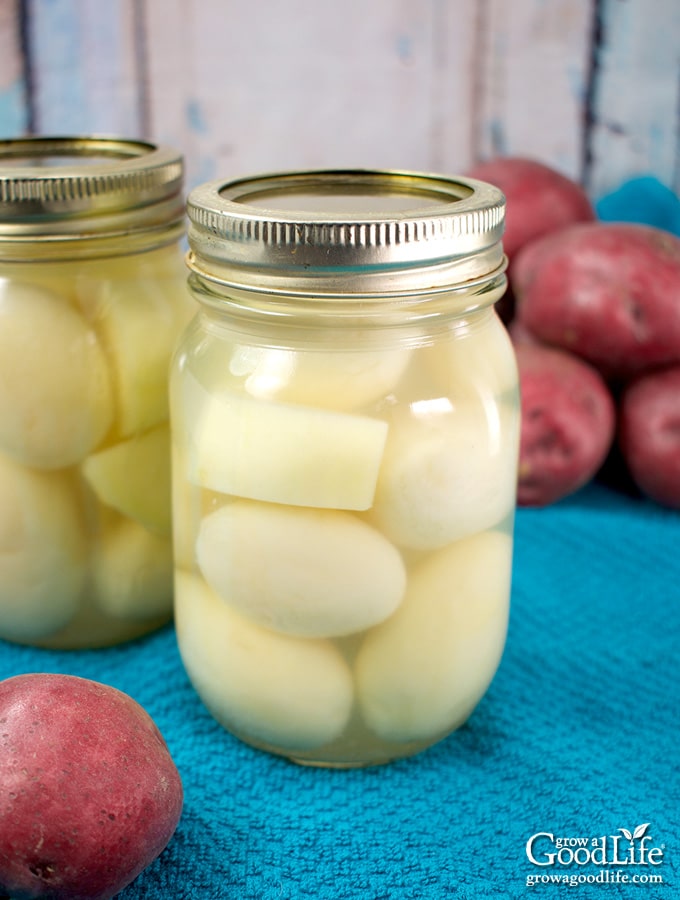
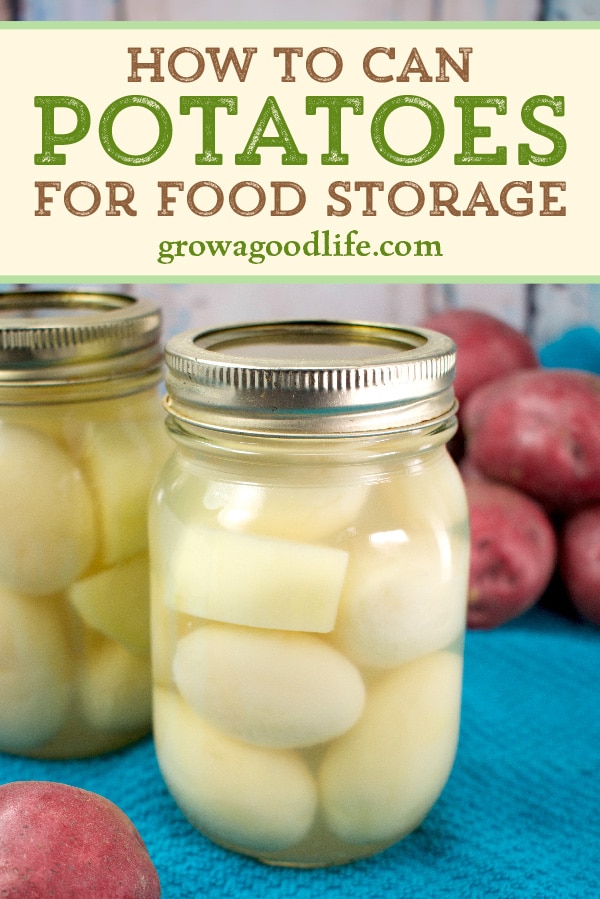
The starchiness of potatoes makes them a bit tricky to can safely. Starch restricts heat from penetrating into the center of the canning jar. So the only way to can potatoes safely is to either choose small to medium-sized mature potatoes about 2-inches in diameter, or cut larger potatoes into 1- to 2-inch chunks after peeling.
You can get more potatoes into the jar by cutting them into 1-inch pieces, but I find these tend to result in mushy potatoes when pressure canned. Small 2-inch whole potatoes and 2-inch chunks remain slightly firm when canned.
A pint jar holds about 11 ounces of 2-inch sized prepared potatoes. You will need about 6 pounds of potatoes for a canner load of 9 pints. Aim for about 24 ounces per quart, or 11 pounds of prepared potatoes for a canner load full of 7 quarts.
Steps for Pressure Canning Potatoes
If you are new to canning or haven't canned in a while, it may be helpful to review this article on pressure canning at the National Center for Home Food Preservation website.
A more detailed and printable recipe can be found at the bottom of this article, but these are the general steps for pressure canning potatoes:
Step 1: Gather Your Canning Gear
- Pressure canner
- 9 pint sized canning jars or 7 quart sized canning jars
- Canning lids and bands
- Canning tools: lid lifter, jar lifter, canning ladle, funnel, and bubble popper
- Plus basic kitchen supplies such as a potato peeler, knife, cutting board, several large pots, small pot, colander, and kitchen towels.
Step 2: Prepare the Canning Jars and Lids
With any canning project, you need to begin with clean, warm jars and lids. Wash your jars and lids with warm, soapy water and rinse well under running water.
Add the jars to the canning rack in the pressure canner. Fill with water, and boil the jars for 10 minutes to sterilize. Warm your lids in a small pot of water over low heat. Keep everything warm until you are ready to can.
Step 3: Prepare the Potatoes
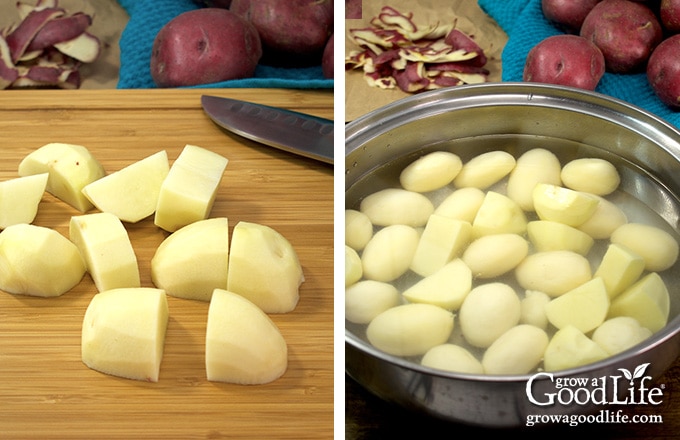
Fill a large pot about half way with cold water. Wash, peel the potatoes, and cut into 2-inch pieces. Leave small potatoes whole if they are about 2-inches in diameter. Trim off eyes, bruises, and any green spots.
As you work, drop the cut potatoes into the pot of cold water. This will help remove some of the surface starch and prevent the potatoes from discoloring from exposure to air.
Drain, and rinse the potatoes with cold water. Fill the pot, par-boil the potatoes for 10 minutes, reduce the heat, and keep them warm until you are ready to can.
Bring a second large pot of water to a boil over high heat and keep warm until you are ready to can. This is the water you will be using to fill your jars. Do not use the water that the potatoes were cooked in. There is too much starch to can safely.
Step 4: Can the Potatoes
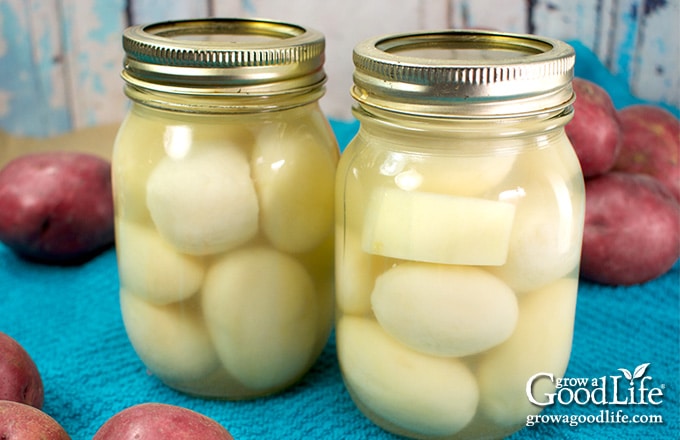
Drain the potatoes and pack them into the jars. Discard the water used to boil the potatoes. Add canning salt if using, and fill the jars with warm water from the second pot. Leave a 1-inch headspace. Try not to pack the potatoes too tightly. There needs to be space between the potato pieces so that water can circulate around the potato pieces while they are being processed.
Remove air bubbles, add the lids and rings, and place the jars into the pressure canner. Follow the directions for your pressure canner and process the jars. Let the canner cool, remove the jars, and let them cool completely. Date, label, and store the jars of potatoes in a cool location. Use within a year.
Pressure Canning Potatoes
Canning potatoes is a great way to preserve an abundant harvest for long-term food storage. The shelf-stable jars are handy for quick additions to meals.
Course Canning
Cuisine American
Keyword canning potatoes
Prep Time 30 minutes
Cook Time 35 minutes
Servings 6 pint jars
Calories 60 kcal
- 6 pounds white potatoes for pints (11 pounds for quarts)
- canning salt optional
- water
Prepare your canning jars and lids:
-
Clean your jars and lids with warm, soapy water and rinse well.
-
Place the jar rack into the pressure canner, set the clean jars in the canner, add water, and bring to a boil over high heat. Reduce heat to medium-high and boil jars for 10 minutes to sterilize. Turn the heat to low and keep jars warm until you are ready to use them.
-
Warm your lids in a small pot of water over low heat.
Prepare your potatoes:
-
Fill a large pot about half way with cold water.
-
Scrub and peel your potatoes. Cut them into 2-inch pieces and place them into the pot of cold water as you go. This will help remove some of the surface starch and prevent the potatoes from discoloring from exposure to air.
-
Drain, and rinse the potatoes well with cold water. Add the potatoes back to the large pot and fill with enough water to cover. Bring the pot to a boil and cook potatoes for 10 minutes. Reduce the heat to low and keep warm until you are ready to can.
-
While the potatoes are cooking, bring a second large pot of water to a boil over high heat, reduce the heat to low, and keep warm until you are ready to can. This is the water you will be using to fill your jars. Do not use the water that the potatoes were cooked in. There is too much starch to can properly.
Can the potatoes:
-
Spread a kitchen towel on the counter. Using your jar lifter, remove the warm jars from the canner, drain, and line up on the towel.
-
Drain your potatoes and discard the cooking water.
-
Fill jars with the hot potatoes. Add 1/2 teaspoon canning salt to each pint jar, or 1 teaspoon to each quart (salt is optional but adds a lot of flavor). Add fresh hot water to the jar, leaving a 1-inch headspace.
-
Run your bubble popper through the jar to release any bubbles that may be caught in between the potatoes.
-
Use your magnetic lid lifter to lift lids out of the warm water, center lid on the jar, and screw on band until it is fingertip tight.
-
Using the jar lifter, place the jars into pressure canner leaving space in between them. Once the jars are all in canner, adjust the water level per your pressure canner's instructions. If adding water, use the hot water from your large pot.
-
Follow the directions for your pressure canner and process pints for 35 minutes, and quarts for 40 minutes at 10 pounds of pressure for at altitudes of less than 1,000 feet. Adjust processing time for your altitude if necessary.
-
When processing time is complete, turn off the heat and allow the pressure canner to cool for about 1 hour.
-
When the pressure canner has cooled, spread a kitchen towel on the counter, unlock cover and remove by tilting lid away from you so that steam does not burn your face.
-
Use a jar lifter to lift jars from canner and place on the towel. Allow the jars to cool for 12-hours. You should hear the satisfactory "ping" of the jar lids sealing.
-
After 12-hours, check to be sure jar lids have sealed by pushing on the center of the lid. The lid should not pop up. If the lid flexes up and down, it did not seal. Refrigerate jar and use up within a few days.
-
Remove the screw on bands and wash the jars. Label and date the jars. Store your jars in a cool, dark place, and use within 12 months. Yields 9 pints or 7 quarts.
- This is a tested safe canning recipe from the USDA Complete Guide to Home Canning. Changing the recipe may make the product unsafe for canning.
- All times are at altitudes of less than 1,000 ft. Adjustments must be made for altitudes greater than 1,000 ft.
Serving: 165 g | Calories: 60 kcal | Carbohydrates: 14 g | Protein: 1 g | Sodium: 290 mg | Potassium: 230 mg | Fiber: 2 g | Sugar: 1 g | Calcium: 10 mg | Iron: 1.3 mg
References and Further Reading:
- Preserving Potatoes – National Center for Home Food Preservation
- Using Pressure Canners – National Center for Home Food Preservation
- Ball Blue Book Guide to Preserving
- USDA Complete Guide to Home Canning
You May Also Like:
- 6 Ways to Grow Potatoes
- How to Freeze Potato French Fries
- 8 Great Tips for Growing Potatoes
Good planning is key to a successful vegetable garden
Whether you are new to growing your own food or have been growing a vegetable garden for years, you will benefit from some planning each year. You will find everything you need to organize and plan your vegetable garden in my PDF eBook, Grow a Good Life Guide to Planning Your Vegetable Garden.

How To Can Potatoes From The Garden
Source: https://growagoodlife.com/canning-potatoes/
Posted by: arneybadeltudy.blogspot.com
0 Response to "How To Can Potatoes From The Garden"
Post a Comment